Docker原理探究
发布于 • 作者: Ethan
What I can't create, I do not understand. -- Richard Feynman
目前的目标是拿到镜像可以运行。 可以从一个简单的镜像开始研究镜像的结构。
我们可以先从nginx开始:
# 保存一个镜像压缩包
$ docker save -o nginx-img.tar nginx:latest
# 解压后结构如下:
$ ls
1036e49d2fa55838959506ed15bbc95a3c14bcd89c5a6d7bd3da6a39ae9e4aea
3f8a4339aadda5897b744682f5f774dc69991a81af8d715d37a616bb4c99edf5.json
c7549efd5dc0e5ae0c658deb653375fd2314224e1add79f9e94517a3aaa3fd9d
ca79e1999ea4761844d77dcd29aa98f68a917b5bea83af85e95449aa9808ed64
manifest.json
repositories
三个哈希值命名的文件夹是镜像层;
哈希值命名的json为镜像配置文件;
manifest.json为镜像清单(描述层结构);
repositories为镜像标签信息。
可以深入探索一下。
$ cat manifest.json | jq .
[
  {
    "Config": "3f8a4339aadda5897b744682f5f774dc69991a81af8d715d37a616bb4c99edf5.json",
    "RepoTags": [
      "nginx:latest"
    ],
    "Layers": [
      "c7549efd5dc0e5ae0c658deb653375fd2314224e1add79f9e94517a3aaa3fd9d/layer.tar",
      "ca79e1999ea4761844d77dcd29aa98f68a917b5bea83af85e95449aa9808ed64/layer.tar",
      "1036e49d2fa55838959506ed15bbc95a3c14bcd89c5a6d7bd3da6a39ae9e4aea/layer.tar"
    ]
  }
]
Config为配置文件路径;
RepoTags为镜像标签;
下方的Layers为镜像层列表,按顺序(底层在前,顶层在后)列出所有镜像层。
镜像标签 镜像标签是镜像的可读性别名,用于标识&区分不同版本,比如:
nginx:1.21标识nginx的1.21版本,ubuntu:20.04标识ubuntu的20.04版本。 也可以用作区分同一基础镜像不同变体,比如:python:3.9-slim:精简版。python:3.9-alpine:基于alpine Linux。python:3.9-debian:基于Debian。 一个镜像可以有多个标签,指向同一个镜像的唯一ID(hash),相当于别名。
总结:manifest.json告诉Docker:tar中有哪些镜像,镜像由哪些文件组成,如何一步步构建。
看完了manifest.json,再来看repositories:
$ cat repositories  | jq .
{
  "nginx": {
    "latest": "1036e49d2fa55838959506ed15bbc95a3c14bcd89c5a6d7bd3da6a39ae9e4aea"
    }
}
repositories列出所有镜像的标签与ID映射,假设tar中有多个镜像:
{
  "nginx": {
    "latest": "1036e49d2fa55838959506ed15bbc95a3c14bcd89c5a6d7bd3da6a39ae9e4aea"
  },
  "ubuntu": {
    "22.04": "a8797e7888c531f422a803989b0e5d7b1a5a5d8a94d7804a2eb1a5df67563d"
  }
}
如果有多个镜像,manifest.json也会变为一个数组
repositories的作用是辅助确认标签映射,验证 manifest.json 中 RepoTags 记录的标签是否与 repositories 中的标签 - ID 映射一致。
镜像ID 镜像ID的本质就是镜像配置文件内容的SHA256哈希值。 例如
1036e49d2fa5...json的哈希就等于1036e49d2fa5...,也就是镜像ID。
我们再来看下镜像配置文件:
$ cat 3f8a4339aadda5897b744682f5f774dc69991a81af8d715d37a616bb4c99edf5.json | jq .
{
  "architecture": "amd64",
  "config": {
    "Hostname": "",
    "Domainname": "",
    "User": "",
    "AttachStdin": false,
    "AttachStdout": false,
    "AttachStderr": false,
    "ExposedPorts": {
      "80/tcp": {}
    },
    "Tty": false,
    "OpenStdin": false,
    "StdinOnce": false,
    "Env": [
      "PATH=/usr/local/sbin:/usr/local/bin:/usr/sbin:/usr/bin:/sbin:/bin",
      "NGINX_VERSION=1.13.8-1~stretch",
      "NJS_VERSION=1.13.8.0.1.15-1~stretch"
    ],
    "Cmd": [
      "nginx",
      "-g",
      "daemon off;"
    ],
    "ArgsEscaped": true,
    "Image": "sha256:dac2e319f33250a5b2eea74443b35d7fb05a382a95d21670f2628b92ffa023ce",
    "Volumes": null,
    "WorkingDir": "",
    "Entrypoint": null,
    "OnBuild": [],
    "Labels": {
      "maintainer": "NGINX Docker Maintainers <docker-maint@nginx.com>"
    },
    "StopSignal": "SIGTERM"
  },
  "container": "71cc5766414f132cf702e88d8de29527bbc2e151f8499b14fcc3540fd853b86d",
  "container_config": {
    "Hostname": "71cc5766414f",
    "Domainname": "",
    "User": "",
    "AttachStdin": false,
    "AttachStdout": false,
    "AttachStderr": false,
    "ExposedPorts": {
      "80/tcp": {}
    },
    "Tty": false,
    "OpenStdin": false,
    "StdinOnce": false,
    "Env": [
      "PATH=/usr/local/sbin:/usr/local/bin:/usr/sbin:/usr/bin:/sbin:/bin",
      "NGINX_VERSION=1.13.8-1~stretch",
      "NJS_VERSION=1.13.8.0.1.15-1~stretch"
    ],
    "Cmd": [
      "/bin/sh",
      "-c",
      "#(nop) ",
      "CMD [\"nginx\" \"-g\" \"daemon off;\"]"
    ],
    "ArgsEscaped": true,
    "Image": "sha256:dac2e319f33250a5b2eea74443b35d7fb05a382a95d21670f2628b92ffa023ce",
    "Volumes": null,
    "WorkingDir": "",
    "Entrypoint": null,
    "OnBuild": [],
    "Labels": {
      "maintainer": "NGINX Docker Maintainers <docker-maint@nginx.com>"
    },
    "StopSignal": "SIGTERM"
  },
  "created": "2017-12-26T18:17:01.106799157Z",
  "docker_version": "17.06.2-ce",
  "history": [
    {
      "created": "2017-12-12T01:44:43.599554271Z",
      "created_by": "/bin/sh -c #(nop) ADD file:f30a8b5b7cdc9ba33a250899308b490baa9f7a9b29d3a85bd16200aa0a28a04a in / "
    },
    {
      "created": "2017-12-12T01:44:43.84546055Z",
      "created_by": "/bin/sh -c #(nop)  CMD [\"bash\"]",
      "empty_layer": true
    },
    {
      "created": "2017-12-12T05:14:40.530307095Z",
      "created_by": "/bin/sh -c #(nop)  LABEL maintainer=NGINX Docker Maintainers <docker-maint@nginx.com>",
      "empty_layer": true
    },
    {
      "created": "2017-12-26T18:14:42.009655355Z",
      "created_by": "/bin/sh -c #(nop)  ENV NGINX_VERSION=1.13.8-1~stretch",
      "empty_layer": true
    },
    {
      "created": "2017-12-26T18:14:42.209098573Z",
      "created_by": "/bin/sh -c #(nop)  ENV NJS_VERSION=1.13.8.0.1.15-1~stretch",
      "empty_layer": true
    },
    {
      "created": "2017-12-26T18:16:59.73279946Z",
      "created_by": "/bin/sh -c set -x \t&& apt-get update \t&& apt-get install --no-install-recommends --no-install-suggests -y gnupg1 \t&& \tNGINX_GPGKEY=573BFD6B3D8FBC641079A6ABABF5BD827BD9BF62; \tfound=''; \tfor server in \t\tha.pool.sks-keyservers.net \t\thkp://keyserver.ubuntu.com:80 \t\thkp://p80.pool.sks-keyservers.net:80 \t\tpgp.mit.edu \t; do \t\techo \"Fetching GPG key $NGINX_GPGKEY from $server\"; \t\tapt-key adv --keyserver \"$server\" --keyserver-options timeout=10 --recv-keys \"$NGINX_GPGKEY\" && found=yes && break; \tdone; \ttest -z \"$found\" && echo >&2 \"error: failed to fetch GPG key $NGINX_GPGKEY\" && exit 1; \tapt-get remove --purge --auto-remove -y gnupg1 && rm -rf /var/lib/apt/lists/* \t&& dpkgArch=\"$(dpkg --print-architecture)\" \t&& nginxPackages=\" \t\tnginx=${NGINX_VERSION} \t\tnginx-module-xslt=${NGINX_VERSION} \t\tnginx-module-geoip=${NGINX_VERSION} \t\tnginx-module-image-filter=${NGINX_VERSION} \t\tnginx-module-njs=${NJS_VERSION} \t\" \t&& case \"$dpkgArch\" in \t\tamd64|i386) \t\t\techo \"deb http://nginx.org/packages/mainline/debian/ stretch nginx\" >> /etc/apt/sources.list \t\t\t&& apt-get update \t\t\t;; \t\t*) \t\t\techo \"deb-src http://nginx.org/packages/mainline/debian/ stretch nginx\" >> /etc/apt/sources.list \t\t\t\t\t\t&& tempDir=\"$(mktemp -d)\" \t\t\t&& chmod 777 \"$tempDir\" \t\t\t\t\t\t&& savedAptMark=\"$(apt-mark showmanual)\" \t\t\t\t\t\t&& apt-get update \t\t\t&& apt-get build-dep -y $nginxPackages \t\t\t&& ( \t\t\t\tcd \"$tempDir\" \t\t\t\t&& DEB_BUILD_OPTIONS=\"nocheck parallel=$(nproc)\" \t\t\t\t\tapt-get source --compile $nginxPackages \t\t\t) \t\t\t\t\t\t&& apt-mark showmanual | xargs apt-mark auto > /dev/null \t\t\t&& { [ -z \"$savedAptMark\" ] || apt-mark manual $savedAptMark; } \t\t\t\t\t\t&& ls -lAFh \"$tempDir\" \t\t\t&& ( cd \"$tempDir\" && dpkg-scanpackages . > Packages ) \t\t\t&& grep '^Package: ' \"$tempDir/Packages\" \t\t\t&& echo \"deb [ trusted=yes ] file://$tempDir ./\" > /etc/apt/sources.list.d/temp.list \t\t\t&& apt-get -o Acquire::GzipIndexes=false update \t\t\t;; \tesac \t\t&& apt-get install --no-install-recommends --no-install-suggests -y \t\t\t\t\t\t$nginxPackages \t\t\t\t\t\tgettext-base \t&& rm -rf /var/lib/apt/lists/* \t\t&& if [ -n \"$tempDir\" ]; then \t\tapt-get purge -y --auto-remove \t\t&& rm -rf \"$tempDir\" /etc/apt/sources.list.d/temp.list; \tfi"
    },
    {
      "created": "2017-12-26T18:17:00.44958667Z",
      "created_by": "/bin/sh -c ln -sf /dev/stdout /var/log/nginx/access.log \t&& ln -sf /dev/stderr /var/log/nginx/error.log"
    },
    {
      "created": "2017-12-26T18:17:00.662765942Z",
      "created_by": "/bin/sh -c #(nop)  EXPOSE 80/tcp",
      "empty_layer": true
    },
    {
      "created": "2017-12-26T18:17:00.902045007Z",
      "created_by": "/bin/sh -c #(nop)  STOPSIGNAL [SIGTERM]",
      "empty_layer": true
    },
    {
      "created": "2017-12-26T18:17:01.106799157Z",
      "created_by": "/bin/sh -c #(nop)  CMD [\"nginx\" \"-g\" \"daemon off;\"]",
      "empty_layer": true
    }
  ],
  "os": "linux",
  "rootfs": {
    "type": "layers",
    "diff_ids": [
      "sha256:2ec5c0a4cb57c0af7c16ceda0b0a87a54f01f027ed33836a5669ca266cafe97a",
      "sha256:73e2bd4455140950d98430338783415109e4c4dcf955681d334b312b176d964a",
      "sha256:a103d141fc9823f04f30d1e71705001577eab94df7ac594e5e49f64e2e506c8b"
    ]
  }
}
看着确实很多,一步步拆解一下:
包含以下内容:
{
    "architecture": "amd64", // CPU架构
     "os": "linux", // 镜像基于的os内核,镜像需要和宿主os内核兼容
     "created": "2017-12-26T18:17:01.106799157Z", // 最终构建时间
     "docker_version": "17.06.2-ce", // 构建镜像的docker引擎版本
}
定义了容器启动的核心参数,也是docker run时的默认配置。优先级低于docker run时的命令行参数(譬如-e)。
主要是在config字段中,有以下重要内容:
"config": {
    "ExposedPorts": { // 镜像声明暴露端口(仅为声明,需要docker run -p 才会实际映射到宿主
      "80/tcp": {}
    },
    "Env": [ // 环境变量列表
      "PATH=/usr/local/sbin:/usr/local/bin:/usr/sbin:/usr/bin:/sbin:/bin",
      "NGINX_VERSION=1.13.8-1~stretch",
      "NJS_VERSION=1.13.8.0.1.15-1~stretch"
    ],
    "Cmd": [ // 默认启动命令(若Entrypoint为空,此命令直接作为启动进程)
      "nginx",
      "-g",
      "daemon off;"
    ],
    "Labels": { // 镜像标签元数据,比如维护者
      "maintainer": "NGINX Docker Maintainers <docker-maint@nginx.com>"
    },
    "StopSignal": "SIGTERM" // 容器停止时发出信号,用于优雅关闭
  },
记录镜像最后一层构建时使用的容器配置,主要在container_config字段。
字段与config类似,但作用不同:
config 是最终镜像的运行配置(供容器启动用);container_config 是构建过程中临时容器的配置(如最后一步执行 CMD 指令时的容器参数),主要用于追溯构建过程,对容器运行无直接影响。按时间顺序记录镜像每一层的构建步骤,与 Dockerfile 指令一一对应。
每个数组元素对应一层,包含 3 个核心字段:
created: 该层的创建时间;created_by: 构建该层的命令(直接对应 Dockerfile 指令),如:ADD file:... in /: Dockerfile 中的 ADD 指令(添加基础系统文件);apt-get install ...: Dockerfile 中的 RUN 指令(安装 Nginx 及依赖);# (nop) EXPOSE 80/tcp: Dockerfile 中的 EXPOSE 指令(声明端口);empty_layer: true 表示 “空层”
ENV、EXPOSE、CMD 等无文件修改的指令),不产生新的文件层,避免冗余定义镜像的分层文件系统结构。
"rootfs": {
    "type": "layers", // 根文件系统类型(此处为分层)
    "diff_ids": [ // 每个元素是一层内容的hash
      "sha256:2ec5c0a4cb57c0af7c16ceda0b0a87a54f01f027ed33836a5669ca266cafe97a",
      "sha256:73e2bd4455140950d98430338783415109e4c4dcf955681d334b312b176d964a",
      "sha256:a103d141fc9823f04f30d1e71705001577eab94df7ac594e5e49f64e2e506c8b"
    ]
  }
综合来看,如果只考虑docker run,只有config和rootfs起到直接作用,其余都是用来追溯构建过程,暂不做考虑。
瞅一眼镜像最后没看的内容:镜像层。
$ ls
VERSION  json  layer.tar

$ cat VERSION
1.0

$ cat json | jq .
{ # 本层的元数据配置,最终配置是所有层元数据合并的结果
  "id": "c7549efd5dc0e5ae0c658deb653375fd2314224e1add79f9e94517a3aaa3fd9d",
  "created": "1970-01-01T00:00:00Z",
  "container_config": {
    "Hostname": "",
    "Domainname": "",
    "User": "",
    "AttachStdin": false,
    "AttachStdout": false,
    "AttachStderr": false,
    "Tty": false,
    "OpenStdin": false,
    "StdinOnce": false,
    "Env": null,
    "Cmd": null,
    "Image": "",
    "Volumes": null,
    "WorkingDir": "",
    "Entrypoint": null,
    "OnBuild": null,
    "Labels": null
  },
  "os": "linux"
}

# 将layer.tar拆开后查看,就是单纯的一层文件
$ ls
bin  boot  dev  etc  home  lib  lib64  media  mnt  opt  proc  root  run  sbin  srv  sys  tmp  usr  var
具体Dockerfile规范可以参考Dockerfile Specification。
只有通过Dockerfile(源头)我们才理解镜像(结果)。
| 指令 | 指令作用描述 | 对镜像配置文件的具体影响 |
|---|---|---|
ADD |
将本地文件、目录或远程文件添加到镜像中 | 1. 创建新镜像层,rootfs.diff_ids 增加对应层的 SHA256 哈希;2. history 数组新增记录,created_by 显示具体 ADD 命令(如 ADD file:xxx in /),empty_layer 为 false(修改文件系统)。 |
ARG |
定义构建时变量(仅构建过程有效,不影响运行时) | 1. 不直接写入最终配置文件字段(ARG 变量构建后丢弃,不出现于 config.Env 等);2. 仅通过 RUN 等指令间接影响 rootfs.diff_ids(动态生成层内容)和 history(体现为 RUN 命令的一部分)。 |
CMD |
设置容器启动时的默认命令(可被 docker run 覆盖) |
1. 更新 config.Cmd 字段,存储默认命令(如 ["nginx", "-g", "daemon off;"]);2. history 数组新增记录,created_by 显示 #(nop) CMD [xxx],empty_layer 为 true(仅修改元数据)。 |
COPY |
将本地文件或目录复制到镜像中(不支持远程文件和自动解压) | 1. 创建新镜像层,rootfs.diff_ids 增加对应层的 SHA256 哈希;2. history 数组新增记录,created_by 显示具体 COPY 命令(如 COPY app /app),empty_layer 为 false(修改文件系统)。 |
ENTRYPOINT |
设置容器的默认执行体(核心程序,不易被覆盖) | 1. 更新 config.Entrypoint 字段,存储默认执行体(如 ["/bin/sh"]);2. history 数组新增记录,created_by 显示 #(nop) ENTRYPOINT [xxx],empty_layer 为 true(仅修改元数据)。 |
ENV |
设置环境变量(构建时和运行时均有效) | 1. 更新 config.Env 字段,添加环境变量键值对(如 ["NGINX_VERSION=1.23", "PATH=xxx"]);2. history 数组新增记录,created_by 显示 #(nop) ENV KEY=VALUE,empty_layer 为 true(仅修改元数据)。 |
EXPOSE |
声明容器内应用监听的端口(仅文档说明,不自动映射) | 1. 更新 config.ExposedPorts 字段,记录声明的端口(如 {"80/tcp": {}, "443/tcp": {}});2. history 数组新增记录,created_by 显示 #(nop) EXPOSE 80/tcp,empty_layer 为 true(仅修改元数据)。 |
FROM |
指定基础镜像,作为当前镜像的构建起点 | 1. 继承基础镜像所有层,rootfs.diff_ids 包含基础镜像层哈希(新层追加其后);2. 继承基础镜像 config 字段(如 Env、ExposedPorts,可被后续指令覆盖);3. history 数组以基础镜像历史为起点,追加后续指令记录。 |
HEALTHCHECK |
定义容器启动后的健康检查命令(检测应用是否正常运行) | 1. 在 config 中新增 Healthcheck 字段,存储检查命令(如 {"Test": ["CMD", "curl", "-f", "http://localhost"], "Interval": 30s});2. history 数组新增记录,created_by 显示 #(nop) HEALTHCHECK [xxx],empty_layer 为 true。 |
LABEL |
为镜像添加元数据标签(键值对,如作者、版本) | 1. 更新 config.Labels 字段,添加标签(如 {"maintainer": "dev@example.com", "version": "1.0"});2. history 数组新增记录,created_by 显示 #(nop) LABEL key=value,empty_layer 为 true(仅修改元数据)。 |
MAINTAINER |
指定镜像作者(已被 LABEL maintainer=xxx 替代,为兼容保留) |
1. 等价于 LABEL maintainer=xxx,更新 config.Labels 中的 maintainer 字段;2. history 数组新增记录,created_by 显示 #(nop) MAINTAINER xxx,empty_layer 为 true(仅修改元数据)。 |
ONBUILD |
定义当前镜像作为基础镜像时,子镜像构建需执行的指令 | 1. 在 config.OnBuild 字段中存储指令(如 ["COPY app /app", "RUN make"]);2. 不影响当前镜像 rootfs 和运行时配置,仅在子镜像构建时生效。 |
RUN |
执行构建命令(如安装依赖、编译代码),并提交结果为新层 | 1. 创建新镜像层,rootfs.diff_ids 增加对应层的 SHA256 哈希;2. history 数组新增记录,created_by 显示具体 RUN 命令(如 RUN apt-get install nginx),empty_layer 为 false(修改文件系统)。 |
SHELL |
设置构建时默认的 shell(如 SHELL ["/bin/bash", "-c"] 替代 /bin/sh -c) |
1. 影响 RUN、CMD 等指令的执行方式(如命令解析逻辑);2. 不直接写入最终配置文件字段,仅通过影响构建过程中的层内容,间接体现在 rootfs.diff_ids 和 history 中。 |
STOPSIGNAL |
指定容器停止时发送的系统信号(如 SIGTERM) |
1. 更新 config.StopSignal 字段(如 SIGTERM);2. history 数组新增记录,created_by 显示 #(nop) STOPSIGNAL SIGTERM,empty_layer 为 true(仅修改元数据)。 |
USER |
设置容器运行时的默认用户/用户组(如 USER nginx) |
1. 更新 config.User 字段(如 nginx 或 1000:1000);2. history 数组新增记录,created_by 显示 #(nop) USER nginx,empty_layer 为 true(仅修改元数据)。 |
VOLUME |
声明容器运行时的匿名卷(持久化数据,避免写入容器可写层) | 1. 更新 config.Volumes 字段,记录卷路径(如 {"/var/log/nginx": {}});2. history 数组新增记录,created_by 显示 #(nop) VOLUME ["/var/log/nginx"],empty_layer 为 true(仅修改元数据)。 |
WORKDIR |
设置容器运行时的默认工作目录(后续 RUN、CMD 等指令在此执行) |
1. 更新 config.WorkingDir 字段(如 /app);2. history 数组新增记录,created_by 显示 #(nop) WORKDIR /app,empty_layer 为 true(仅修改元数据)。 |
这里补充一些关于pivot_root的背景知识。
貌似原来Docker使用的是chroot,后来改成了pivot_root。
来看下描述:
SYNOPSIS #include <sys/syscall.h> /Definition of SYS_ constants */ #include <unistd.h>
int syscall(SYS_pivot_root, const char *new_root, const char *put_old);
DESCRIPTION
pivot_root()changes the root mount in the mount namespace of the calling process. More precisely, it moves the root mount to the directory put_old and makes new_root the new root mount. The calling process must have theCAP_SYS_ADMINcapability in the user namespace that owns the caller's mount namespace.
pivot_root()changes the root directory and the current working directory of each process or thread in the same mount namespace to new_root if they point to the old root directory. (See also NOTES.) On the other hand, pivot_root() does not change the caller's current working directory (unless it is on the old root directory),and thus it should be followed by a chdir("/") call.
这些是啥意思呢?我们需要从linux底层开始理解。
一个进程需要访问多种不同文件系统的存储资源,为了解决这个问题,linux使用了挂载命名空间。命名空间我们都熟悉,是隔离资源的常用手段,挂载命名空间也是如此。
一个挂载命名空间,本质上是一张独立的挂载表,其中每一个记录是一个挂载点。挂载点本质是表中记录的逻辑路径->文件系统的映射。
如果从内存数据结构的视角来看:
struct vfsmount,存储了:
struct super_block *mnt_sb,如ext4,OverlayFS等FS的元数据。struct dentry *mnt_mountpoint,即挂载点作为目录在父文件系统的dentry。struct list_head mnt_child,该挂载点下的其他子挂载点(形成树)。struct vfsmount *mnt_parent,指向父挂载点。mnt_namespace,包含:
struct vfsmount *root,该命名空间的根挂载,即 / 对应的 vfsmount。struct list_head list,该命名空间内所有 vfsmount 结构体的集合。atomic_t count,记录使用该命名空间的进程数(进程退出时减少计数,计数为 0 时销毁命名空间)。当进程访问/a/b/c时,内核会从根挂载点开始解析,找到/a的挂载点,/a/b的挂载点,最终定位到文件系统。
我们搞清楚了背景,再来看pivot_root做了什么。
int syscall(SYS_pivot_root, const char *new_root, const char*put_old)
接收两个参数,new_root和put_old,都为目录的路径。假设当前挂载命名空间的根挂载为old_root。
new_root路径必须是当前挂载命名空间中存在的目录,且必须是一个挂载点,表示希望容器/进程最终看到的根目录(/)对应的原始路径。
put_old必须是new_root目录下的子目录,作用是给旧根目录(原系统的/)找一个临时存放处,使其成为新根目录的子目录,避免直接删除/卸载旧根时的冲突。
简单来说,pivot_root做了以下事情:
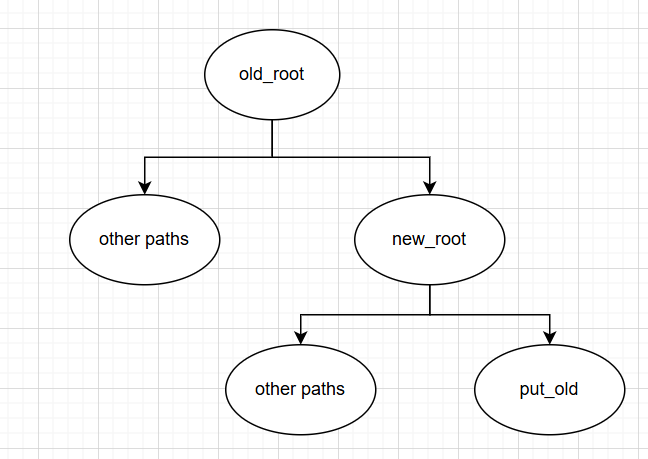 起始状态
起始状态
切断new_root与原父挂载的联系(也就是从原父挂载的mnt_child链表中移除。
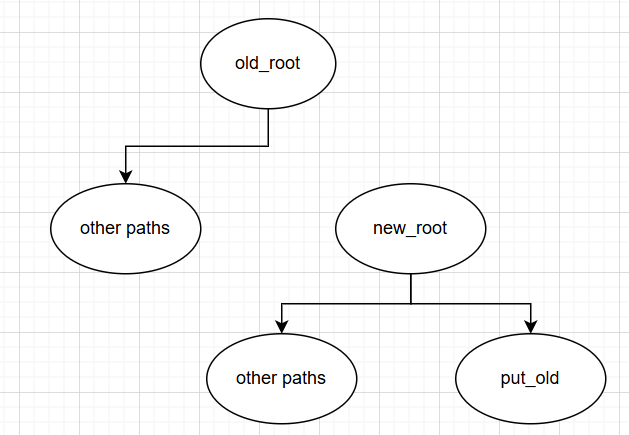
把old_root挂载到put_old目录。
old_root的父挂载设为new_root。old_root的挂载点设为put_old。old_root加入new_root的mnt_child链表(成为子挂载)。
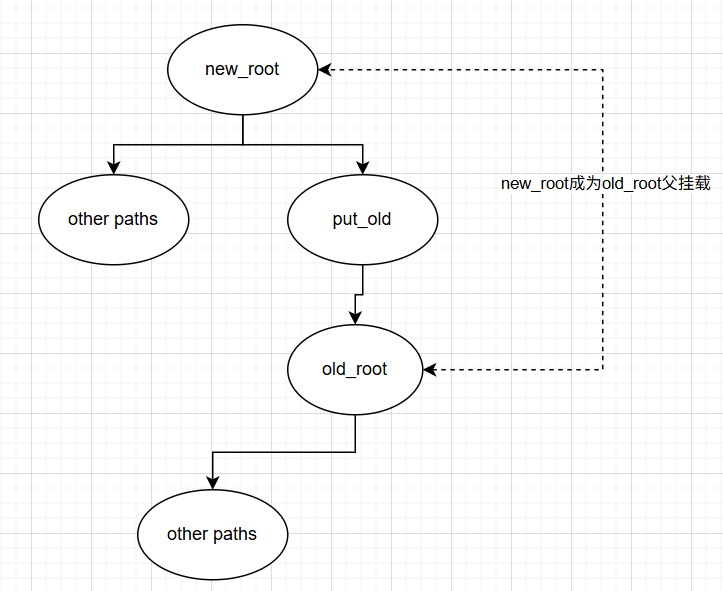
将当前命名空间mnt_namespace的root指针从old_root改为new_root,此时/正式变为new_root。
更新挂载点引用计数更新,确保指向old_root的所有旧引用刷新到new_root。
现在我们知道了这个系统调用是什么,docker run的过程中如何使用的呢?
docker首先通过clone()系统调用为容器创建一个独立的命名空间(使用CLONE_NEWNS flag)。
CLONE_NEWNS (since Linux 2.4.19) If
CLONE_NEWNSis set, the cloned child is started in a new mount namespace, initialized with a copy of the namespace of the parent. IfCLONE_NEWNSis not set, the child lives in the same mount namespace as the parent.
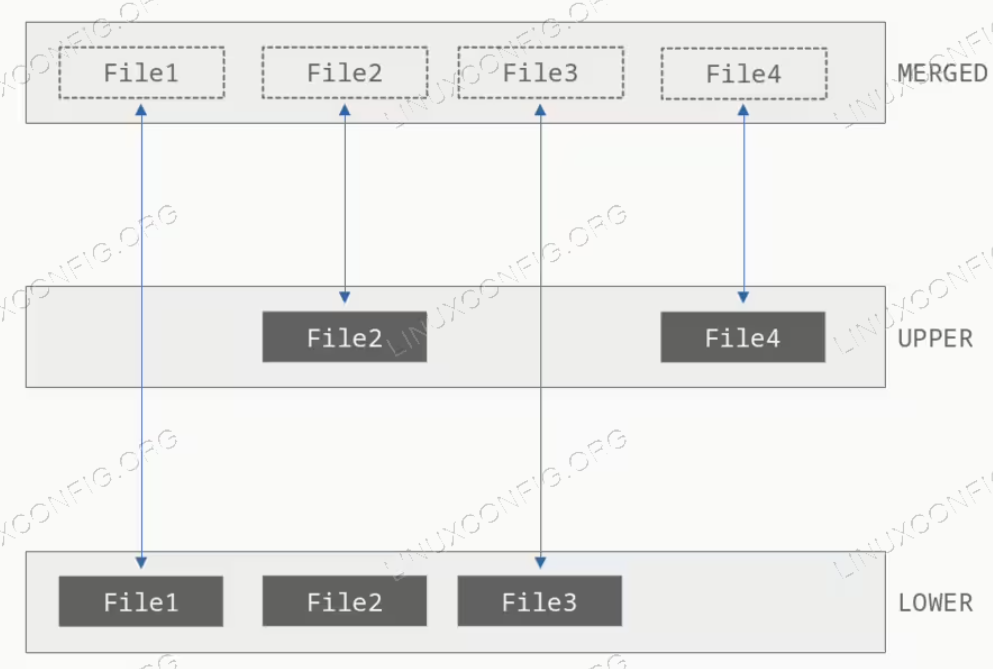
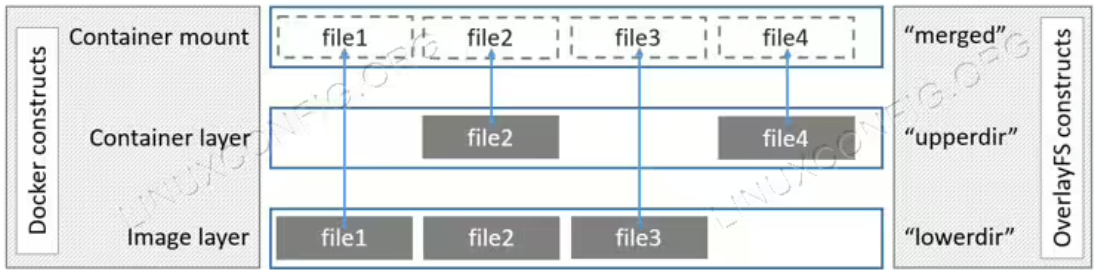
准备文件系统(OverlayFS)合并&挂载。这一点后续会介绍,我们现在只需要知道docker合并了一些目录,并且挂载在了merged文件夹下。
mount -t overlay overlay \
-o lowerdir=xxx:yyy,upperdir=zzz,workdir=aaa \
merged
这里简单介绍一下mount
mount()attaches the filesystem specified by source (which is often a pathname referring to a device, but can also be the pathname of a directory or file, or a dummy string) to the location (a directory or file) specified by the pathname in target. 内核支持的文件系统类型值列在/proc/filesystems中。 可以查看overlayFS:$ grep overlay /proc/filesystems nodev overlay
切换到新的挂载命名空间并执行 pivot_root。也就是我们上文中提到的内容:
syscall(SYS_pivot_root, "/container/merged", "/container/merged/oldroot");
卸载old_root目录,彻底切断容器和宿主机FS联系:
umount /container/merged/oldroot
启动容器内进程。
我发现这篇文章是个不错的intro。
要创建一个容器,就需要先弄清容器保存了哪些元数据。
我们直接看moby的源码:
type Container struct {
 StreamConfig *stream.Config
 // We embed [State] here so that Container supports states directly,
 // but marshal it as a struct in JSON.
 //
 // State also provides a [sync.Mutex] which is used as lock for both
 // the Container and State.
 *State          `json:"State"`
 Root            string  `json:"-"` // Path to the "home" of the container, including metadata.
 BaseFS          string  `json:"-"` // Path to the graphdriver mountpoint
 RWLayer         RWLayer `json:"-"`
 ID              string
 Created         time.Time
 Managed         bool
 Path            string
 Args            []string
 Config          *containertypes.Config
 ImageID         image.ID `json:"Image"`
 ImageManifest   *ocispec.Descriptor
 NetworkSettings *network.Settings
 LogPath         string
 Name            string
 Driver          string

 // Deprecated: use [ImagePlatform.OS] instead.
 // TODO: Remove, see https://github.com/moby/moby/issues/48892
 OS string

 ImagePlatform ocispec.Platform

 RestartCount             int
 HasBeenStartedBefore     bool
 HasBeenManuallyStopped   bool // used for unless-stopped restart policy
 HasBeenManuallyRestarted bool `json:"-"` // used to distinguish restart caused by restart policy from the manual one
 MountPoints              map[string]*volumemounts.MountPoint
 HostConfig               *containertypes.HostConfig `json:"-"` // do not serialize the host config in the json, otherwise we'll make the container unportable
 ExecCommands             *ExecStore                 `json:"-"`
 DependencyStore          agentexec.DependencyGetter `json:"-"`
 SecretReferences         []*swarmtypes.SecretReference
 ConfigReferences         []*swarmtypes.ConfigReference
 // logDriver for closing
 LogDriver      logger.Logger  `json:"-"`
 LogCopier      *logger.Copier `json:"-"`
 restartManager *restartmanager.RestartManager
 attachContext  *attachContext

 // Fields here are specific to Unix platforms
 SecurityOptions
 HostnamePath   string
 HostsPath      string
 ShmPath        string
 ResolvConfPath string

 // Fields here are specific to Windows
 NetworkSharedContainerID string            `json:"-"`
 SharedEndpointList       []string          `json:"-"`
 LocalLogCacheMeta        localLogCacheMeta `json:",omitempty"`
}
检查了一遍,如果只是想实现docker run,需要至少以下字段:
root或1000)bridge,None等)bridge下分配